Wednesday 10 October 2012

Spring has well and truly sprung

Oh deary me, it has been sometime since I have posted anything. Between a 4 week placement for uni, assignments, work etc etc I have been very slack indeed. However, now that Spring has arrived, I am super excited, pretty much because the warmer weather means that plants are just growing like crazy! I couldn't believe it, once we had a couple of warm days, my silverbeet shot right up and so did everything else. I am very pleased with how things are going in the garden.


Bees are just going crazy for the Lavender and other flowers in the garden. I love to have a lot of companion flowers in the garden, not only because they look really pretty but the bees love them, and they will help to pollinate some of my summer veg. 


Beautiful new growth of my fig tree

Nasturtiums do tend to take over a little, so if you don't want this, than keep an eye on them, however, they are a lovely contribution to the veggie garden, they sprawl all over the place, they have a pretty flower, they are edible and super easy to grow from seed. 

These corn seedlings have been growing like crazy. This is my first attempt at corn so it is more an experiment than anything, and if I get something out of it, well fantastic! I did an order with the Diggers Club and so these corn seedlings were grown from seed...so super easy! Corn is a summer crop and so far, it has been very easy to get growing.

 I use these old birdcages to stop possums from eating my crop. I have parsley, silverbeet and other salad greens growing here. I still cannot get over how crazy they have gone now that the weather has warmed up.Give them some liquid fertiliser and they are as happy as leafy greens could be!

Last year, my garlic went so well, so I decided to plant triple the amount. I cannot wait to see how this year's organic garlic goes. To me, home grown garlic is one of the most excited and satisfying crops to grow in the  home garden. 

Monday 13 August 2012

A day at the gardens

I love the botanical gardens in Sydney. It is one of my favourite places in this sometimes hectic city, with great views over the harbour. If you are going to live in or near a city, I think Sydney is one of the best, as there are so many great, FREE things to do here, and you can usually count on the weather being pretty bloody good, even in the wintertime...(see below!)


My mum always brought me here as a kid, and then once I was old enough to catch the train alone (about 13) I used to venture in here alone or with a friend, to wander, imagine, draw, take photos and to feel inspiration, mostly in regards to creating my very own garden one day. 

On this particular day out, I felt inspired by the gardens' vegetable and native bush tucker food garden. I gained a lot of inspiration from their plants and design, not only for my current garden, but for a garden that I will one day have when I own my own home. I also learnt heaps, like you can eat Lomandra and Sydney rock lily...I had no idea!

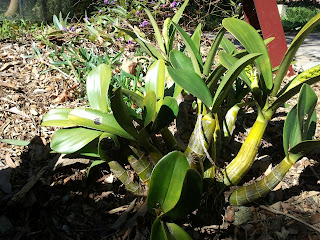
Rock lily (dendrobium speciosum), the starchy stems were eaten raw by Gadigal people or after roasting them over hot coals. I have a huge rock lily in my front yard and am tempted to try!


Native raspberry. This plant is prickly but grown out of the way, as it is here in the gardens can be a great addition. I am very tempted to look into buying one. 

Warrigal greens or native spinach is a prolific groundcover. I don't have any in my garden but I think might introduce some soon, especially as a great addition to spinach pies and frittatas. 


This beautiful hardenbergia is coming into bloom, and adds colour to this eucalypt. In my own garden I have a hardenbergia climbing up through a Geraldton wax and when the two are in flower, the site is absolutely beautiful Hardenbergia's are a climbing plant and bear a very pretty and dainty purple flower from now until summer. They are a great addition to any type of garden. 

Spring is in the air...


After feeling a lot of frustration with my possum problem this winter, it was great to get some ideas and inspiration into how to help stop the problem.


Some very healthy Kale...


What a beautiful and perfect tree...the tuckeroo. 


Saturday 21 July 2012

Guerrilla Gardening: "Do the right thing - plant trees"

Guerrilla gardening is absolutely one of my favorite things to do. It is everything that makes me passionate about gardening, bush regeneration and the environment. The reward and satisfaction of seeing plants, you have planted into a non-productive, weedy space is so gratifying and pleasing. I love it. I hope that others can feel and do the same. 

My current guerrilla gardening project...
Before I began planting here, this site contained ONE tree...this callistemon  (bottlebrush) you can see in the middle ground.
It is a little difficult to tell from the pictures but over the last 6 months to one year, my project has developed really well and I am happy with the results. Before I started on this project, I had been thinking about guerrilla gardening for a while, however, I needed to stop thinking about it and just do it. This park is in the same suburb as my home and my first attempt failed dismally. This park is in a couple of sections. It is more a thoroughfare between a top street and a bottom street with some greenspace and some 'old' spaces that were perhaps supposed to hold plants but either died or never got planted. I planted some plants in the top space but upon my return a month or so later, the plants had disappeared. I suspected that residents had pulled them out, not knowing what they were and fearing that their water views would be ruined (don't be shocked, this often happens and it is incredibly frustrating). So I decided to work on the lower space, with much success...plants are doing well!

The mighty Cupaniopsis anacardioides OR the common name, Tuckeroo. What a great name for a tree and a very sturdy tree that is. This tree will grow in so many ridiculous conditions, so it is the perfect guerrilla tree planting specimen. BTW this is an Australian native. All my guerrilla plants are Indigenous natives to the area. So I suppose you could also call it guerrilla bush regen.
For more information: 


Before I began planting here, this site contained one tree, therefore, it is reasonably susceptible to being overgrown by weeds. Council sprayers spray the weeds every few months and I must be sure that the plants I plant are supposed to be there and are not weeds. 
The arrows point to dianellas. These are also a good guerilla gardening plant as they are easily propagated  from runners and they spread reasonably quickly, suppressing weeds, looking good and the berries are edible. 


I like to use wooden stakes around the plants, to ensure the council sprayers don't 'accidentally' poison my plants. 


I am extremely happy with these mighty plants. The beautiful banksia...I was lucky enough to snatch these up from a left over bush regen job. I have planted three and they are doing exceedingly well (touch wood). Over the past 6 months, they have shot up from about 60cm to almost 2metres high. Once these are established, they will look great, offer shade and be beautiful to look at. In the background, you may see some acacias. I cannot remember what variety they are, I know that they will grow to about 3 or 4m high. I planted these from tubs about 6months to one year ago and these have shot up so quickly. They are also another great guerrilla gardening plant, very easily obtained from tubestock or propagated by oneself. 


This is a small section alongside the path that leads down the lower level. Overrun by non-productive and boring weeds, I have planted some dianella tubes, blady grass and other native grasses I have propagated. My dad, who works as a bush regenerator  detests blady grass, and in some cases, I agree with him.However, it is a good guerrilla gardening plant, as it is incredibly tough, spreads quickly and suppresses weeds. I would much prefer to see a tuft of blady than an area overrun by bidens or lantana. I am lucky that there are spare rocks lingering around the site which I can use in my 'gardening' (see above). 

Some tips:
- if you are interested in doing some guerrilla gardening, choose a site. Start small, start big.
- choose your plants: Indigenous natives? Veggies? Flowers? Make a seed bomb (I plan on doing this as the weather warms up). 
- In some cases, I propogated plants, I bought them or had leftovers from work that I could use. 
- Sometimes I do put some money into this, it is my hobby and it is something I enjoy doing so I don't mind spending some dollars on tubestock natives, which are very cheap anyway - about $2-$3 per tube. 


Wednesday 18 July 2012

Homemade presents for a sweet friend.

A homemade card, a brooch, a hairpin, some earrings and a bangle.
I met one of my greatest friends when I was 12. I had started year 7 and I did not like it, I had trouble making friends and when asked what I did on the weekend, I never admitted that I had been gardening because that just wasn't very 'cool'. Until Sweeda came along, someone who I could be completely open with. As Anne Shirley, from Anne of Green Gables would say, we were 'kindred spirits'. 

However, when we were 15, Sweetpea moved away to England, we have not seen each other since, except for on skype and we have maintained our long distance friendship for almost 10 years now. No matter how far away she is, I still consider her as being my kindred spirit. So, after not sending a birthday gift for a few years now, this year, I needed to get my act together to create something special. 


I made:
- a card using an old book I found from a library throw out. It contains some great pics and these can so easily be turned into cards. Super easy to do, just find a picture you like, cut it out and stick it onto some cardboard. Wallahh...homemade card!
- hair pin, using a bobby pin, some felt and an old button.
- a brooch, using some felt and embroidering skills-something which i don't really have or have never learnt, just something i have kind of just made up as i have gone along.
- some earrings - easy to make, using some beads, earring hooks etc
- a bangle, using an old bangle and some recycled wrapping paper. 
- a garland, using pictures from an old picture book I found. Look for pictures you like and cut out circles in all different shapes and sizes. I laminated the circles so that they can last longer. Use a hole puncher to make holes to thread through string...this is one of my fave things...a super easy little gift to give. 

I like to have a theme to my garland. These pictures were from  a book about birds. I have previously made myself one with a farm theme. 

I like to include cut-outs of text as well as pictures. 


Close up of garland. This one is to be hung vertically. 


I love you sweetpea. Hope you had a wonderful birthday. I hope we can meet up soon. You always have a special place in my heart. 


Monday 9 July 2012

Baking with lemons


It is winter. During winter, I often feel like eating. I like fat and sugar. Recently I have been feeling a little deflated about the garden. Possums have been having a lovely old time munching on my broccoli, lettuce, silverbeet, kale, parsley...and the list goes on. So, what to do when you are feeling a little de-motivated. Turn your energies to other pursuits, such as crafts and cooking.

Today, my lovely friend Emily came over. We met in primary school, in Mrs Chalmers' 4C, Em was new to the school and we instantly struck up a friendship. While my parents worked in the cafe, Em and I would walk to her house to play with our barbies, play travel agents or have pretend cooking shows. She is one of my oldest and dearest friends. At the ripe old age of 22, we can say that our friendship has lasted for over ten years.

Today, we did a spot of gardening, some walking and chatting and some cooking. We had loads of lemons (found from a lemon tree somewhere nearby), so we decided to bake a lemon slice. However, this isn't just any lemon slice, oh know. This is my mum's lemon slice and that means, it is pretty good. Now, everyone usually thinks their mum is the best cook in the world. I think my mum's cooking is pretty awesome but her cake baking skills are second to none. My parents used to own a cafe when I was younger and my mum baked all the cakes so she had a fair bit of time to practice...baking 4-5 cakes every couple of days. My mum's lemon slice was pretty popular, so Emily and I decided to give it a red hot go. Oh and it tasted pretty de-lish!

My mum's delicious lemon slice


Ingredients:

for the base
250g butter, softened
1 cup icing sugar
2 cups plain flour

for the top
2 cups sugar
4 eggs
juice from 4 lemons
2 tbsp plain flour

Method:
1. Line a baking tray (I used one that is about 31cmx21cm) with baking paper
2. Combine butter, icing sugar and flour in a blender until it full combines into a ball.
3. Press this mix into the tray until it covers the surface of the tray. Cook in oven on about 160 degrees until the top begins to slightly brown.


4. Using the blender, combine sugar, eggs, strained lemon juice and 2 tbsp plain flour. Blend until combined and pour over the base.


It is very important to taste the mixture, you know, just to check it's not poison or  anything! 

Note: do this step whilst waiting for the base to brown up. If you do this and are still waiting for the base to brown up, give the mix another blend before you pour over the base, as the sugar will have settled to the bottom. 
5. Bake in the oven for about 20 minutes and check on the slice. It should feel firm to touch. 


The slice is ready! It is firm to touch and now leave it to cool so it is easy to cut up. 
A very civilised afternoon tea.


Tuesday 19 June 2012

Pesky possums


possums are loving my crop of broccoli and silverbeet 


Possums are the bain of my life. They are constantly eating my veggies and, in the past, have almost made me give up. I have tried a few different strategies...quassia chips, organic 'poss off' sprays which is simply some smelly citronella and other things which is supposed to keep them away but none of them have worked. Every now and then, I think they have moved away because things will stop getting eaten, and then, just as soon as everything has sprouted, they come back and eat everything up.

When I worked at my local nursery, one of the biggest questions I got was, how do you keep possums out? I live in a very bushy suburb and my dad and I have specifically planted up our garden with lots of native trees and bushes, so naturally, they are attracted to this.

My only answer is, to physically block them out. So, on Monday, I got me some trellis and erected some small barriers around my garden beds. In the past, I have never had to buy this stuff, I usually find it in council clean-ups, however, lately, I haven't managed to pick any up. My nursery sells a roll of 6m for approximately $22, it is uv resistant and so it doesn't break down in the sun, and it can be reused for years.

I protected these seedlings about a month ago and these broccoli  and silverbeet  seedlings are doing really well. I have simply used some old wooden stakes, hammered them into the ground and used old pantyhose to tie the trellis to the stakes. 

I also use old birdcages (found from council clean ups) to protect parsley, lettuce, kale and spinach
I fenced this bed off only a couple of days ago, so many of the seedlings had been munched  on a lot! I am hoping they will spring back to life in the next few weeks.


OK, this bed doesn't look like much at the moment but this is my 'soup bed'. I have planted carrot, leek, silverbeet, broccoli, celery and parsley seeds. These are all perfect seeds or seedlings to plant right now. They just need some sun, water and food (liquid fertiliser). 


Planting potatoes

I have never grown my own potatoes before, so when I was at my local nursery recently, the box of seed potatoes were calling me. I had to think whether I had a spot for them and I did, so I could not resist! I was really excited to plant my very first crop of potatoes.

I will update as to the progress of my potatoes but when planting them on Monday, the process seemed relatively straightforward. I know potatoes don't like too much water, as they can be susceptible to rot, so finally, after all this Sydney rain stopped, and the sun came out, I thought this the perfect time to get my planting underway.

As Peter Cundall states, seed potatoes are the best potatoes to plant in the garden because they are free of diseases and viruses that can affect tuber growth and production. You are more likely to achieve a bumper harvest by purchasing certified seed potatoes.

What do you need:

1. Potatoes...
(I chose sebago, as they are a good, all rounder potato, I have heard relatively hardy, I might splash out with some more interesting potato varieties if these go well)


2. A plot...

(I had originally used this bed for flowers, however, now the summer annuals are well and truly gone, I thought this would be perfect...lots of sun and holy moley...so many worms!)


3. Compost....beautiful, rich compost...full of worms. 


I could not believe how many worms were contained in this load of compost...it was crazy!

Potatoes can be grown in a number of ways, they can be grown in big gardens, small gardens and on patios and verandahs. However, as I have pretty good space in the city, I chose the simplest and probably old-fashioned way of growing them...In-ground production, where crops are grown in trenches and then hilled with soil. 

Once you he purchased your seed potatoes, encourage potatoes to sprout prior to planting by exposing them to some light (not direct sunlight). The potatoes will start to develop small shoots (as they do when you leave them in the cupboard for too long). Once they have established some shoots, cut the potatoes up, so each section contains a shoot. For every average sized potato I had, I cut into halves and threes, making sure, each had an 'eye' or shoot. If a potato only had one shoot, than I didn't both cutting it. 

I then prepared my plot. The soil I was planting into was already quite rich, I knew this because the soil was dark, moist and full of worms...some signs of pretty healthy soil. So I used some of the compost from my bin and forked it into the bed. You can also use some manure. I didn't have any, so stuck to the compost, raked up some leaves from around the garden and applied a little sprinkling of blood and bone. 


I then dug my trenches...and placed the potato seeds into them. I planted them approximately 20cm apart and around 10cm deep.


After this, simply cover the potatoes with around 10cm of soil and water.I sprinkled some blood and bone over the top and watered it in. Right now, it just looks like some soil but hopefully in a few times I will have some exciting shoots! 
* As the potato begins to emerge, cover them with soil, taken from either side of the trench. Repeat this process of 'hilling the crop' several times during the first four to six weeks of growth. 
* Peter Cundall says that hilling potatoes with loose soil and compost allows the tubers can swell freely.Covering developing tubers protects them from sunlight, which turns them green.Hilling also provides them with excellent drainage and creates a form of irrigation. 
* correct watering is vital during the first six to eight weeks of planting, as this is when the tuber develops. Don't over water but don't let them dry out, during winter, this means around every 2 to 3 days or so. 

Right now is the perfect time to plant some potatoes. They are very easy and can also be grown in pots and containers. 

Container potatoes:
*select a well draining pot, container, wheelbarrow, bathtub or hessian sack (make sure it is well draining, meaning the water can drain through the pot). 
*mix 50/50 compost and some good quality potting mix, add some mulch or grass clippings to the mix. 
*place about 10cm of the soil mix in the bottom of your container and lay potatoes, spaced, around 20cm apart (depending on the size of container). and cover with about 10cm of soil mix. 
*as the shoots appear, continue to progressively cover with the compost/soil mix, until the container is full and then mulch well. 

Harvesting:

I will know when to start harvesting my potatoes, by 'bandicooting', harvesting a few potatoes at a time while leaving the remainder to grow. I am told home-grown spuds can take up to 20 weeks to harvest, whilst commercial growers can usually harvest in around 12 weeks. So I am thinking if I planted them in mid-June, I will hopefully, start to get some crops by September/October. When foliage growth starts to die back, it means you are unlikely to get anymore tubers forming and they will be ready to harvest. 

I am super duper excited.